Saturday 31 May 2014

British WW2 Sherman company

This is a fairly uniform unit being made up of just Sherman M4s and Fireflies, and all Takara. But the British also tend to have a lot of tank markings so they work well to illustrative the benefits of adding decals. I have repainted over all the original colour schemes, weathered the vehicles and added decals.

A photo of the overall force: A company with HQ and 3 platoons supported by some independent tank brigade platoons to the rear left.


The most interesting vehicle is the Sherman ARV which I converted from a Takara M4 hull and bits of plasticard etc. I couldn't find this particular version of the Sherman recovery vehicle from any manufacturer and really wanted one. I am happy with how it turned out


Some photo of the various Shermans to show the benefits of adding decals. The British come up particularly well because of the different markings. The number in the red square is the regimental number. The yellow box with the bull is the 11th Armoured Division, while the independent tank brigade platoons have markings for the 8th, 9th, 22nd and 23rd Armoured Brigades. The little yellow circle with the number 30 is a bridge plate - it shows the weight and so helps to ensure that tanks don't go over bridges that can't hold them. The turret sides have the squadron marking and finally on the rear is an Allied star for recognition from the air.


Finally, some close-ups of the village. These are TimeCast 6mm buildings from their Napoleonic range. Painted by TimeCast and based by me. I used a 6mm Adler Prussian Landwehr  figures to make the statue in the village square.


Friday 30 May 2014

US WW2 Combat engineer platoon

A shorter post just focusing on an American combat engineer platoon. Some minor conversion involved for the trucks - I will identify the manufacturer etc. as I go through the detailed descriptions.

A photo of the overall force: HQ section, two operating squads and a weapons squad:


The HQ section:


The Bazooka guys are Pendraken as is the one with the bangalore torpedo on the command stand. The other figures are Arrowhead Miniatures.The jeep is Arrowhead but I have fitted an MG in the back which is a bit of brass rod and a Pendraken roof top MG. The truck is New Toys Millennium - I removed the bits underneath that connect it to its stand and added some stowage from the Takara bits that come with their models (and a small roll of barbed wire from a large roll I had to do barbed wire fences). The bulldozer is Pendraken and the Sherman dozer is Pithead.

First operating squad:


The figures are all Pendraken except the guys with rifles and they are Arrowhead. The truck is New Toys Millennium but I have cut the back down to make it a flatbed and glued in and painted some sand to make a dump truck. To give variety I have used both standard US engineers, airborne and marine engineers/ pioneers. These are the Pendraken codes:
  • A35: Combat engineers, bangalore torpedo and flamethrower,
  • A57: US Para engineer, mine detector,
  • A58:  US Para engineer, bangalore torpedo,
  • MC21: Pioneer, M2 flamethrower.

Second operating squad:


The only difference for this squad is the truck has been converted as a troop carrier. I added 'seats' as a strip from some plasticard and then the men are from a Pithead M5 half track.

Weapons squad:


The truck is unmodified (except removing the bits for the stand underneath - and for all the trucks I gave them a wash with Agrax Earthshade). The figures are all Pendraken.


A final word on the town. These are 6mm buildings from the TimeCast Southern Europe range. I found someone selling off their old building sets on ebay and bought a few but also got him to paint up and base a larger town for me (and very happy with it).


Thursday 29 May 2014

Applying WW2 decals

First a brief overview of what is out there.

The decals I particularly like are by Scale Specialties. Here is their website but you can often get them from 10mm manufactures and on ebay too (which saves me having to import from the USA):
http://www.ss-sms.com/112513smsdecals.html

They are good because they are great quality, the right scale and come in large sheets with plenty of individual decals (and I go through a lot of Allied stars in particular so being able to get a lot on a single sheet is a real bonus). They also do things I can't find elsewhere such as regimental numbers and bridge plates for British tanks.

The "Decal Details" range also have some useful decal sheets. Again many manufacturers carry these.
http://www.i-94enterprises.com/products/decals-setting-solution/decal-scans/

They are for aircraft / armour and often have a range of sizes on the sheets and you may get some that are not of use. The sheets I use are:
  • RU-100, Russian stars. Half have a yellow outline and half are just plain red stars. I only use the latter and some are too big and some are too small so there is a fair amount of wastage but red star decals are surprisingly difficult to find. Also, it you keep the unwanted bits tidy then someone will usually buy them on ebay!
  • RU-108, Russian tank numbers. These come in red and white. I go through the white ones quite rapidly but the red ones are only of use on whitewashed tanks. One thing to note is that the decals are actually in strips so you need to cut between each number so that they come off as single decals when put in water.
  • GR 100, German crosses. Some of the larger ones are too big for even a Tiger 2, but actually if you use captured Russian tanks painted as Germans then they used very large crosses to make sure they were properly identified and the larger crosses on this sheet are perfect (I will do a post at some point on my various captured tank repaints).
  • NR-104, red tank numbers with white outline. These are not actually listed on the site now so not sure if they are still available. But really good if you want to do a lot of German tanks with red numbers and white border (but also useful for Canadian and some British 'funnies'). Like RU-108 they are in strips so you need to cut between the individual numbers.
Pithead and Pendraken also carry some decals where I can't tell who the manufacturer is. Examples are minor nation markings and Russian tank slogans. Some of these are not individual decals - if you put the whole thing in water you would just get one big decal! So whatever you cut out is the decal and so if you don't want a big border then you need to cut close to the actual image (this was difficult for Russian and US white slogans as very difficult to see clearly and also small!). I also have a sheet of Sd Kfz 250/251 decals which includes crosses, numbers and registration plates - I think I got this on ebay but can't remember. This is also essentially a single huge decal so again cutting out around very small things.

For the Germans I have a lot of Panzer Korps kits and they each come with a decal sheet. So a lot of my basic need for German crosses is met from these and they include some tank numbers too - and a tip if you don't mind getting fiddly, you can cut out the individual number in a 3-digit decal (e.g. 123) to make up different 3- or 2-digit numbers (e.g. 213, 312, 21, 22, 23 etc.). This approach is useful given I have a lot of the same decal sheets.

To round off this section, a couple of things to watch out for when you  buy or use decals:
  • are the decals actually suitable for your vehicles or are the really for a larger or smaller scale? Occasionally I have bought decals advertised as 10mm and they have turned out to be 6mm or 15mm. It can sometimes be obvious when you look at the picture on the web but not always. I have managed to get a refund when this happened.
  • Some decal sheets don't all come off as individual decals and you need to cut between or sometimes all around individual images - not a real problem, although can be fiddly, but you do need to be aware before you stick them in water! Hold the decal up to the light and move about to try and see where the borders of the decals are if you are not sure how they will come off.

Applying the decals

Equipment:

  • shallow dish for the water (I actually use the inside of an old jam jar lid);
  • brush to lift out and apply the decals (I use a long bristled size 0, but size 1 or 2 would be better for large Allied stars or longer slogans);
  • fixing and settling solution (I use Micro Set and Micro Sol - names are a bit misleading, but more below);
  • suitable paint wash to dull the decal;
  • matt varnish.
All the decals described above are the water slide variety and I am sure most of you are well familiar with those (if not you just put them in water and they slide off - but as they are small use very shallow water or the surface tension makes it a pain to get them out!). But note the comments above about whether the decals are individual pieces or need to be cut around before you add them to the water. I have also found that some of the squadron markings and the bridge plates (small yellow circle with a number in it) from the Scale Specialties NW Europe British set can end up joined so from experience you will find which ones need to be cut between the individual images to avoid trying to pull them apart later.

Micro Set and Micro Sol, or the equivalent from another manufacturer, as essential for getting a good effect with decals. Micro Set is put on the vehicle before the decal and helps fix it in place (it is also apparently a decal remover - but doesn't work once I have varnished them). Micro Sol essentially melts the decal into the vehicle. For 10mm vehicles the decals are so small that I have found that Micro Set is not really needed and the decal can just be put straight on to the vehicle. I have used it occasionally with a bumpy vertical surface though. Micro Sol is the really essential part of the whole process to make sure your decals stay put and look part of the vehicle.

The steps for applying decals:

After lifting the decal out of the water, and trying to remove some of the excess water, place the decal where it needs to go on the vehicle. I use a brush as the decals are small and it is a bit fiddly getting in the right place and then pushing them round to get them level.

Leave to dry for a bit - not essential but prevents them moving again and having to be re-positioned when applying the Micro Sol.

Using a brush apply some Micros Sol to the whole surface of the decal. This needs to be done several times and the first time I tend to avoid putting on too much to stop the decal moving. Leave for 20 minutes or so then apply some more - second and subsequent times you can happily put a lot on to help the process of fusing the decal into the model. I tend to do this 4 or 5 times but you will be able to tell once the decal is well fused to the model.

Just a note on putting decals on uneven surfaces. This is often the case for Allied stars on half-track or truck bonnets or the rear of AFVs where the engine grill is. When the decal is applied it won't always sit that well but this is not a problem. Apply a lot of Micro Sol (i.e. load up the brush) and just be careful to push back into position if this make it move. Because there is a lot of the solvent the decal gets soft very quickly and is easy to tear or crease. This just means leaving longer between applications - probably about an hour. Here is an example of how well this works:


So, don't be shy with the Micro Sol. It doesn't do anything to the rest of the model so you don't have to apply precisely and once the first application has fixed the decal in place you can happily drown it! Other than what it does to the decal it just evaporates.

Once the decal is fixed and dry I use a wash to dull it down. I use Games Workshop Agrax Earthshade. However, as I use this to wash all my vehicles as part of the painting process, this means a light coat over and around the decal does not then create a patch of a different colour. If you don't do this then I would suggest a very light cover and stick to the area of the decal (although I highly recommend a wash as part of the painting to bring out the detail and make the vehicle look used).

I then use a mat varnish to finish off the decal (an artist acrylic varnish applied with a brush is how I do it - Windsor & Newton Acrylic Matt Varnish is properly matt). I usually then spray the whole vehicle with Army Painter Anti-Shine (more a light wafting from 30cm several times than 'spraying' as such if you want a really matt effect).

You will be able to see from my later posts what sorts of decals I apply to the various nations and types of vehicles.

Any question just leave a comment and I can add further explanation if needed.

Wednesday 28 May 2014

US WW2 Armor

My first substantial post on WW2 and I will go through some of my US armor units (to note I have used the American spelling but it will be armour when I do the British!).

A photo of the overall force: 5 platoons with HQ and a light tank platoon. I will go through each part of the force in detail below and I will discuss each individual vehicle and touch on manufacturer comparisons etc. as I go.


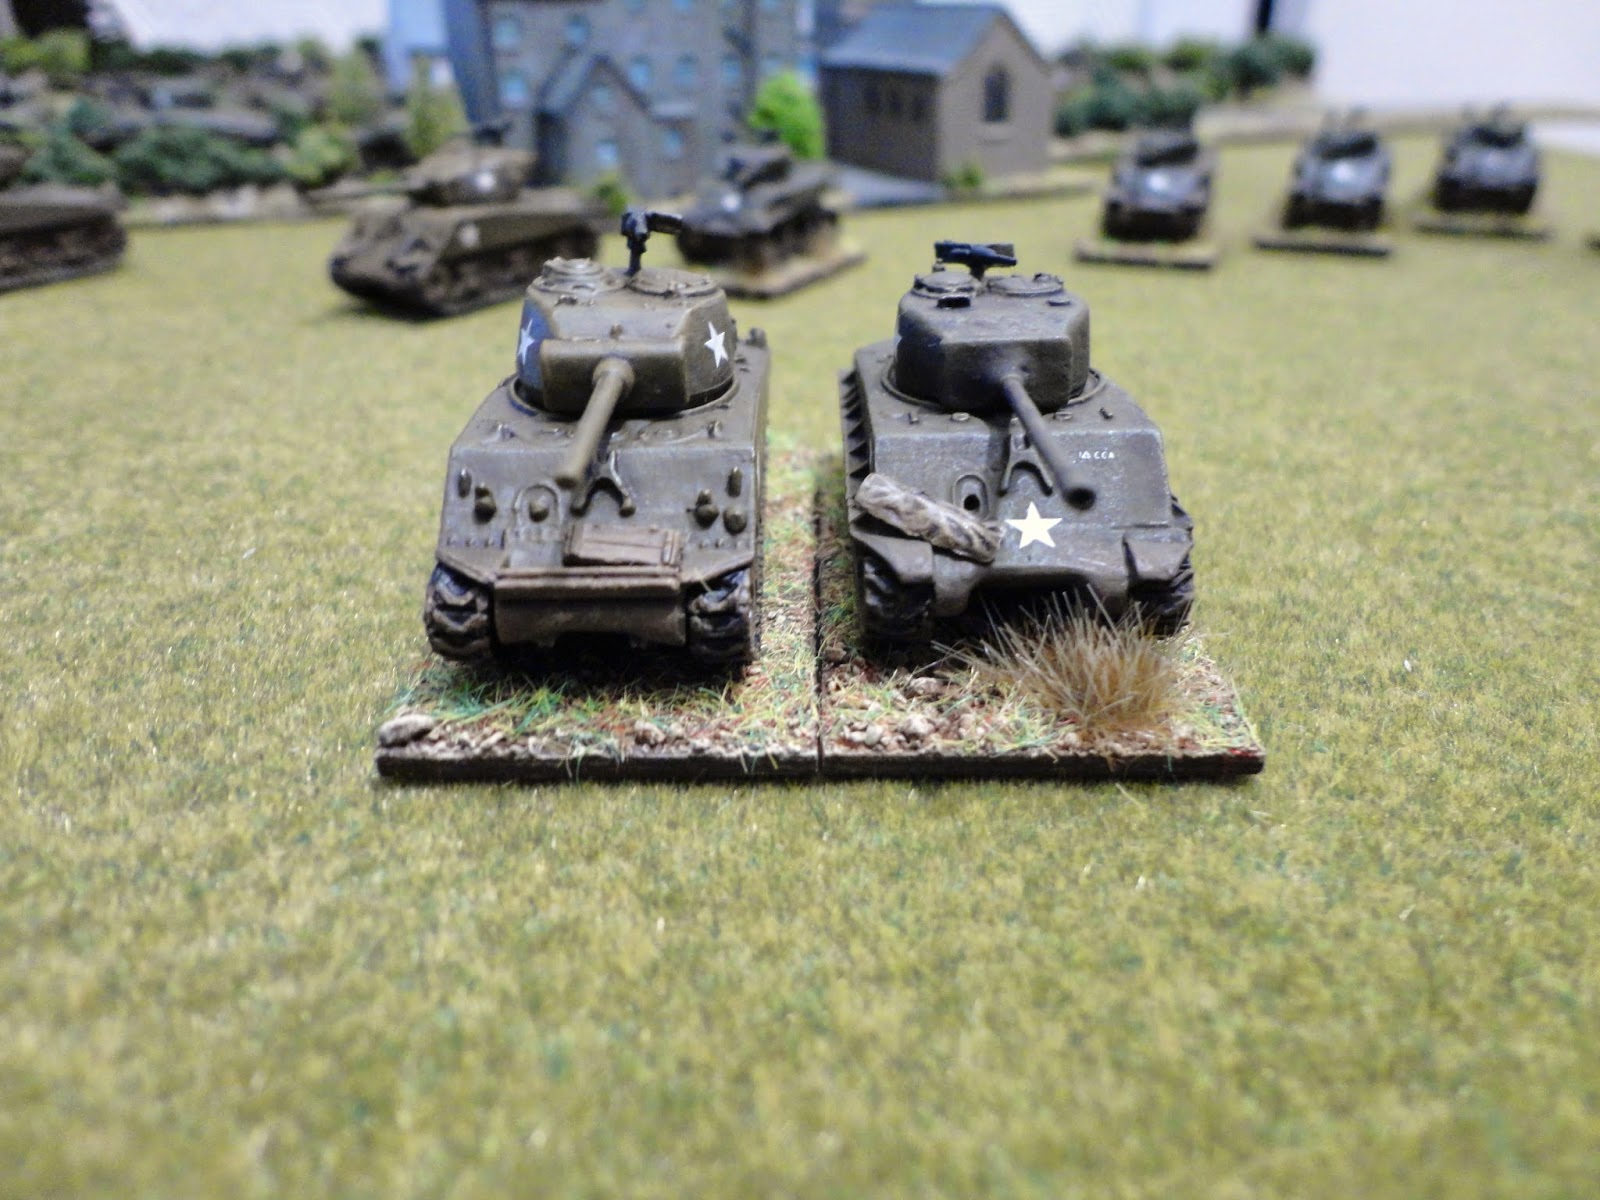
Sherman M4A1: Takara

These are simply the Takara M3A3 turret put on the Takara M4 76mm body - and I have done the other way round too as you will see below. While I will mainly use later Shermans in my games this gives me the option to field a platoon of the earlier version. Other than using a wash to weather the vehicles they are as they originally came except that I have added an Allied star on the back of the platoon command tank.

The platoon is travelling through the 'Town' so I will take this opportunity to say a bit about it.

The buildings are all 6mm TimeCast - painted by TimeCast and based by me. I will do later posts on what materials etc. I use to base up buildings. The specific buildings are:
  • the nearest is 3/021 Berlin Town Houses and apartments;
  • across the street is 6/003 French village street;
  • and 6/005 Dutch church.
As you can see from the close up photos the buildings work very well for WW2 and also with 10/ 12mm scale (if you put a figure up against a door it would look too small but the effect of the overall size comparison on a games table feels right to me).
.


Stuart M5 light tank: Arrowhead Miniatures (or Wargames South as they were when I actually bought them)

These are a multi-part metal kit which I have built and painted. I used a darker green than for other tanks and it does not photo quite as well so I have added an extra photo taken against a white background. Numerous Allied star decals added - it really livens up tanks when you can add national and unit markings. I will do a later post about decals including what I use and how to apply. I have based all my metal tanks as it helps to protect from paint being damaged (the bottom and edges of the tracks are a particular problem). 

Size wise they look fine against the M4s and as all my Stuart versions for the Americans are Arrowhead then they fit in no problem at all.


Sherman M4A3E8: Arrowhead Miniatures

this is an older model and just comes as the hull, separate tracks, the turret and a roof top MG rather than the many part kits of their later models. I have added various bits of stowage from the plastic sets that come with most Takara models. The decals I have added include the vehicle registration number on the side - which is a pain to put on as it is difficult to see on the decal sheet being very small and white on a light background, but adds to the look of the finished tank. I will be expanding my number of this version when I get round to doing American vehicles again.


Now for some size comparisons. As you can see below the Arrowhead tank is very slightly smaller than the M4A3 76mm Takara (I have sat that on a base to allow better comparison - and this is a debate I am still having with myself, whether to base all my tanks or not). But the difference is so slight it is not noticeable in general use. However, this is an older Arrowhead model and they did tend to be a bit smaller than plastic 1/144 but the new Arrowhead models are a bit larger than the plastic equivalent - not to the extent that they can't be used together particularly if not the exact same tank. You will be able to see more comparisons in later posts.


Sherman M4A3 76mm: Takara

This is the other half of the swap I mentioned above - the turret from the Takara M4 76mm and the hull from the Takara M4A3. These I have repainted and added new decals, plus some of the Takara stowage that you get with their tanks, plus a metal roof top MG from Pendraken. I really like they way these have turned out.


This one is painted up as the tank of Lt. Col. Creighton Abrams. Other than painting on his distinctive tank markings I have added a commander which is an Arrowhead figure.


Company command - M4 105mm and M32 recovery: Takara and Metal Troops

The command platoon has along with the two standard M4A3s an M4 105mm plus an M32 recovery tank.

The M4 105mm I converted by cutting off the gun and adding a tube to represent the 105mm howitzer.  The M32 is a Metal Troops vehicle and comes with anti-mine rollers.


Sherman M4A3: Takara

The normal Takara Sherman but I have added a roof top MG using a Pendraken metal MG and added the Cullen prong hedge cutter to two tanks per platoon (again from Pendraken). Other than that some extra decals and weathering.


Sherman M4A1 76mm: Takara

the normal Takra M4 76mm but repainted, new decals and stowage on some. The one in front is painted up as the tank of Staff Sergeant Lafeyette Pool. So in addition it has a commander figure, roof top MG, track added on the turret sides and hull plus a Cullen prong hedge cutter.


I will do later posts covering American Tank Destroyers, artillery, infantry and various support units. I will also be doing the other main nations - and they have a lot more tanks so will probably take several posts to cover.

Scenery talk - hedges

For this post I want to show you the hedges I now use.

I have never found the various ones you can get in railway model shops that satisfying (often not very realistic at these smaller scales) and I have made my own in the past and they are fine but there is only so much time in the day! When I found an ebay shop in the UK (attercliffejunction) that sold 10mm hedges I gave up on the idea of doing my own. He does not have 10mm listed all that often but I have checked and he still does them - and if you are in the UK he goes to wargame shows under the name TreeFellas. The Bocage he did at my request (his brother does a 15mm set) so you may need to ask before he will prepare any for sale.

There are 3 different types and I will go through each and discuss the suitability for both 10mm and 6mm. The vehicle in the photos is a 1/144 CanDo Jagdpanther and the infantry and Adler 6mm Austrians. I have photographed with the hedges alongside a slightly raised road as well a on the flat.

Maintained hedges:

I guess these are suitable for any area where someone would be keeping the hedges trimmed reasonably often, so I would be using around villages and along roads mainly.

For 10/ 12mm WW2 these work fine as low hedges. They look fine with a large vehicle like the Jagdpanther - which can fire over - and are about chest high on 10mm infantry (those pictured are Arrowhead Miniatures Americans):


For 6mm Napoleonics they also work well as a high hedge, but the guys can still just see over the top:


Rural, standard hedges:

A normal size hedge with more of a country feel. The hedges above are clearly a planted single variety hedge where these are a mix of different bushes etc. such as you would find in the country where things are left to themselves more.

For 10 / 12mm WW2 these work very well. There is some variety in the height of the hedge but big vehicles can still be seen behind them and can still fire over much of it


For 6mm Napoleonics these also work well and give a nice effect, plus the guys can still see over parts of the hedge:


Bocage:

I have only shown for WW2 as it would be more like low trees for 6mm! They give a good feel I think with large vehicles hidden behind and unable to shoot over: