First some photos of the finished model from various angles and the next section has Games Workshop figures on the model so you can see the scale properly. Unfortunately, I started well before my blog and so no early photos of how I constructed it so a bit of a description will have to do. I talk about construction in the final section of the post. As always click on the photos to get bigger versions to see the detail better.
Hope you enjoy what is also easily my longest post.
Helm's Deep photos:


Some shots of the causeway:


Shot in through the main gate - you can see the doorway Aragorn and Gimli used to get outside and attack the Uruk Hai on the causeway (outer door in later picture). Note I have not put in a gate as I will be making removable gates for closed, open and partly destroyed.

Doorway out down to the start of the Deeping Wall - something else I will be doing to add to the model. I plan to do in 3 sections with the middle bit with the drainage tunnel in an intact and destroyed version.

Some shots now of the gap between the inner and outer walls. The roadway climbs and is lower at the far side, climbs up to the main gate and then continues to climb to the archway in the inner wall.


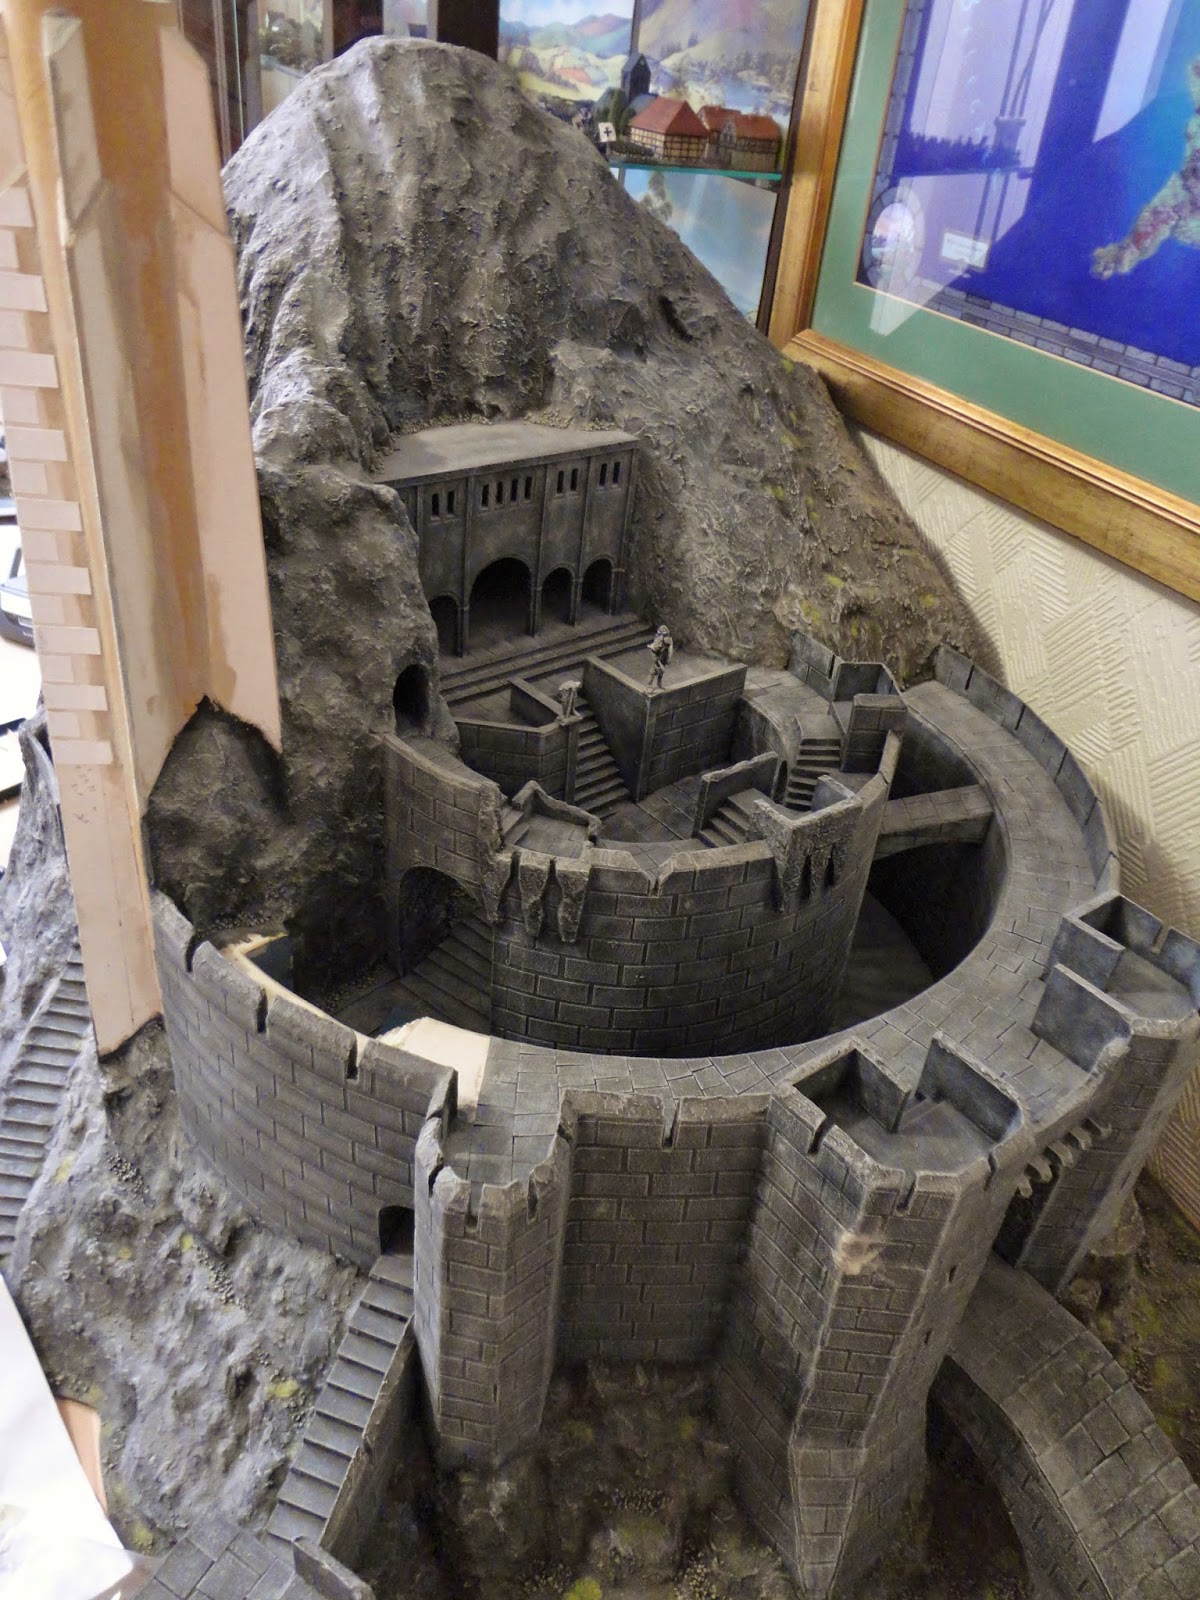
The main hall at the top and rear of Helm's Deep.


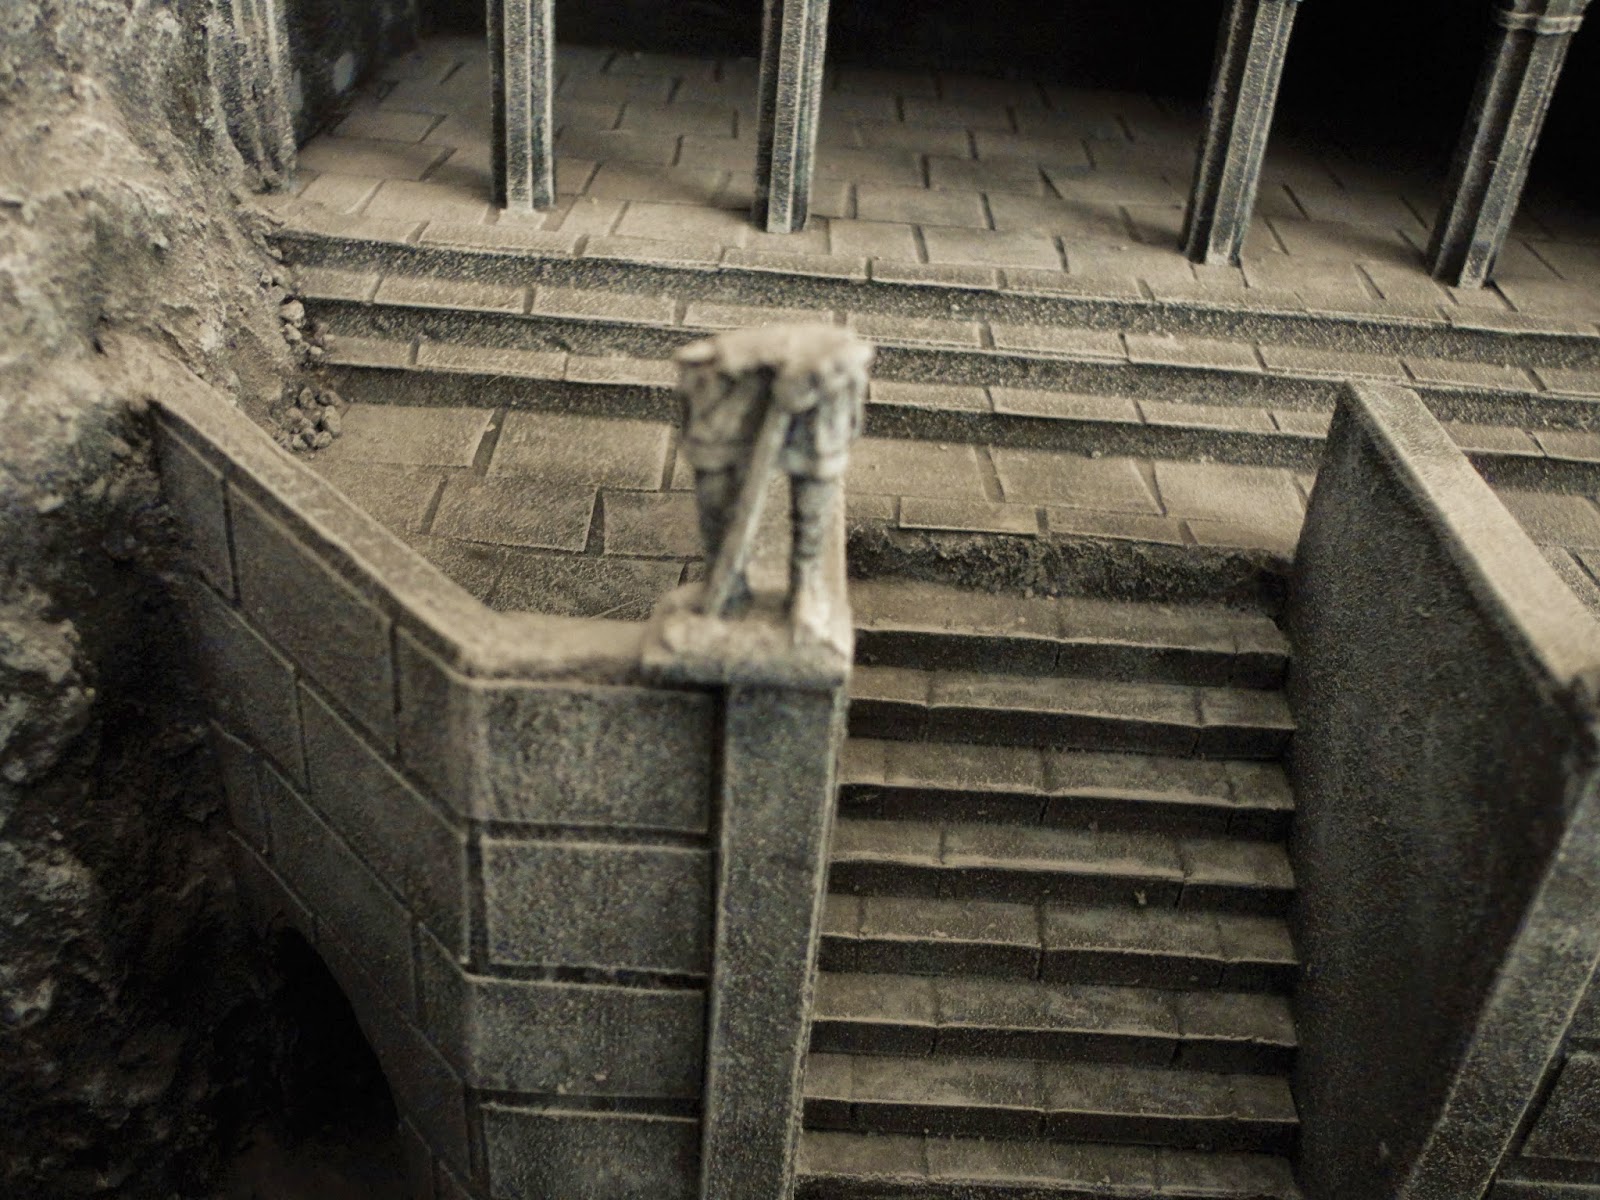
Various shots on the inner courtyard:


The side with the stairway that Aragorn and the Elves escaped up after the Deeping Wall blew.


The rocks above this rear entrance:

Some shots from the side of the inner courtyard and top of the main gate:


And here is the door that Aragorn and Gimli emerged from to attack the Uruk Hai on the causeway to relieve pressure on the gate:

The rocks on the other side:


Helm's Deep with Games Workshop Figures:
First, apologies for purists as I have not actually painted any Rohan guys as yet so have used some Gondor figures and some Uruk Hai (but hardly the hoards seen in the film!).
Cavalry charging down the causeway into the advancing Uruk Hai:


Legolas in the gate tower:
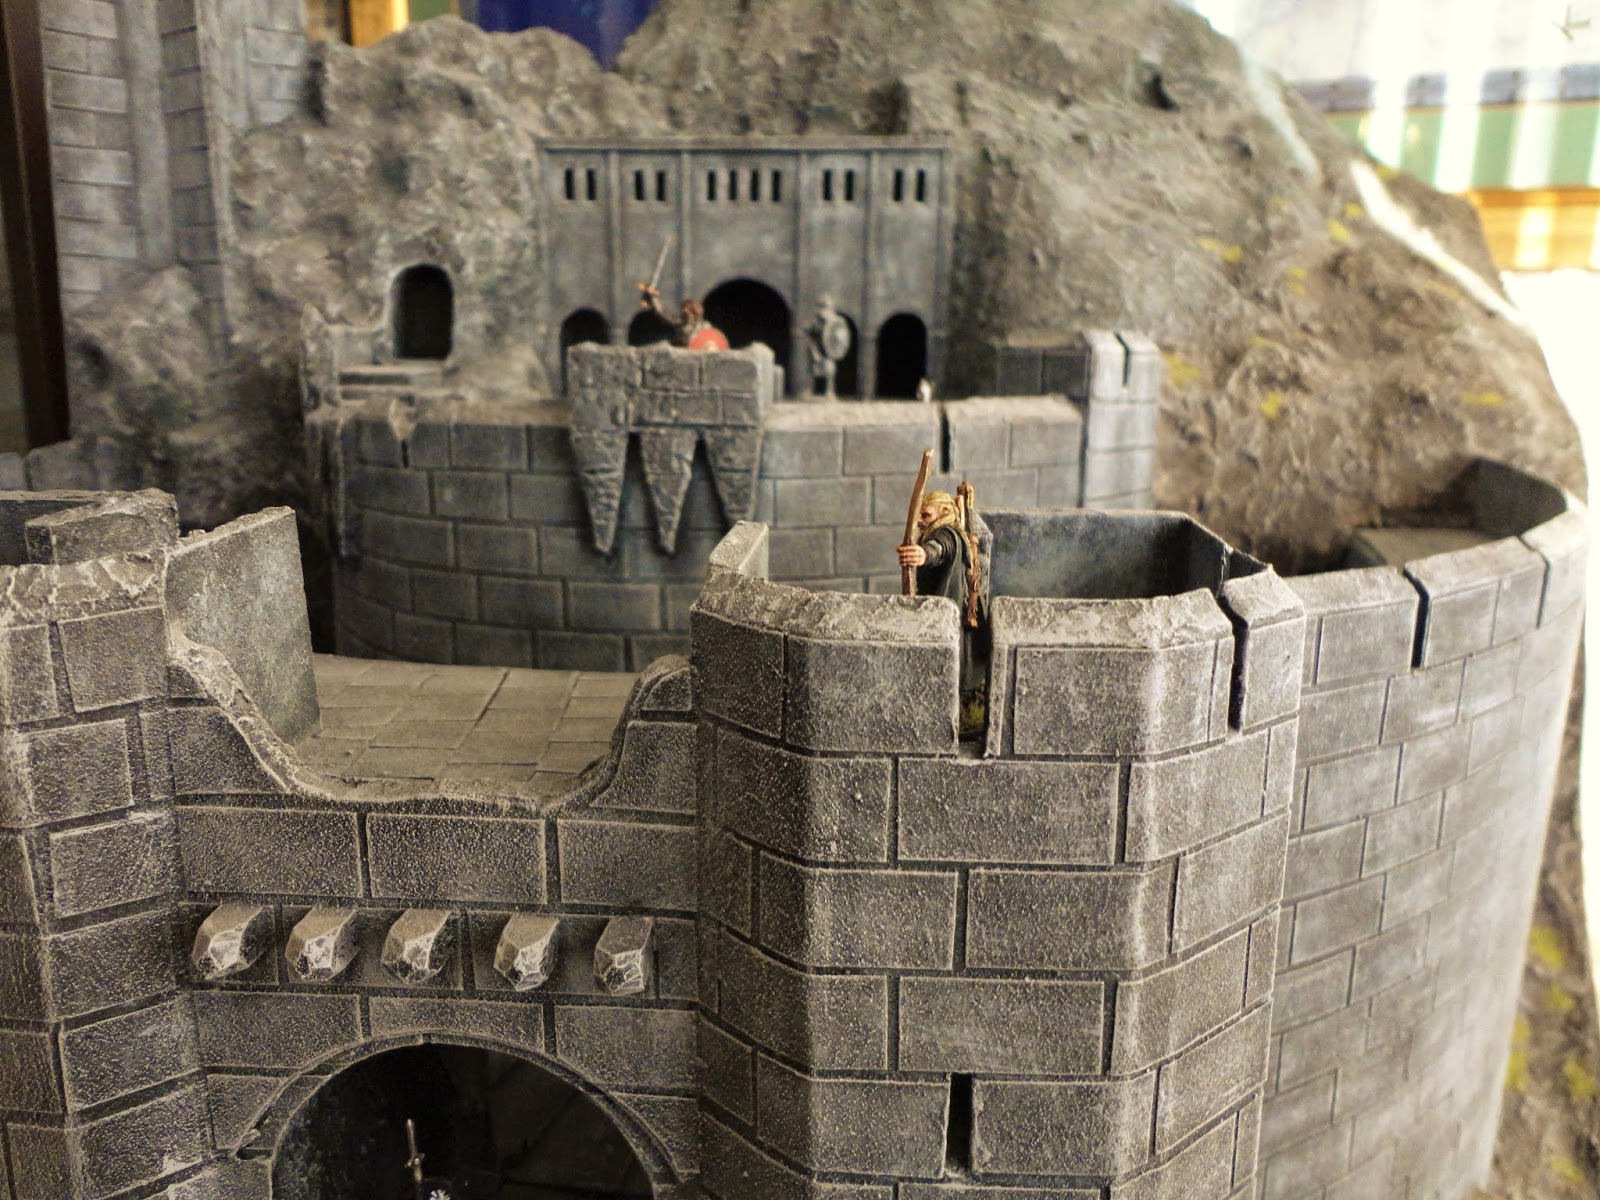
With Boromir manning the crumbling tower on the inner wall:


Legolas in a last ditch defence of the main hall:


And a guy in the Hornburg:


And next to a Rohan house I made as a bit more scale comparison:

So how did I make it?
First, the size. The model is 103cm long from the back of the model to the end of the causeway. It is 73cm wide. The rear rocks are 62 cm at their highest and the Hornburg tower is 67cm to its top. It is surprisingly light, very easy to pick up (although a bit awkward due to the size) - all to do with the materials used but it is also very sturdy.
Materials:
- MDF board for base and back and side piece;
- expanded polystyrene;
- artist mounting board;
- foam board;
- thin card;
- lots of 'no more nails' type glue (the big tubes used in decorators guns);
- several pots of Pollyfilla Woodflex;
- paints (black, medium and light grays, scorched brown and bleached bone (last 2 are GW paints);
- various big brushes (the dry brushing really wears them down!);
- craft knife - and lots of blades;
- picture framing knife - to cut at 45 degrees;
- hot wire cutter;
- pencil and string (because I just don't have a compass that big for drawing circles!);
- large ruler;
- jig saw.
Step 1:
Planning - very very important with a project of this size and complexity. I have the Lord of the Rings extended editions and the Appendices on the extra discs have lots and lots of information about building the sets and hence were invaluable in working out what the model needed to look like. Next this needs to be transferred into a plan for the model. I used an MDF base and started out with a larger pieces and drew the outlines of the walls and stairways and causeway etc. on the board and checked that against the size of the figures. The MDF base and sides were then cut with a jig saw to fit the plan and the back wall and side piece fitted on with 'no more nails' glue and wooden battens. This gave the framework for building the model. Here is the back of the finished model so you can see what I mean about the frame:

Step 2:
Two keys things to do next: make the templates for the walls and start building up the base.
The walls are parts of a circle with a larger outer and smaller inner circle. I used artists mounting board for the templates - it is the stuff you see inside framed prints or photos etc. that gives the border to the picture. They come in A1 sheets and are about 1.5mm thick and white one one side and different colours on the other - I happened to have a lot of blue as I had been using for the sea in a miniatures game years ago. As the circles are big using a school compass is not really on so I used a pencil with string tied to it and anchored to the center point. Here are some of the templates, or part templates, I still have - others I later used in the model as described in later steps:
I bought some expanded polystyrene sheets from the local DIY shop - 8 feet by 3 feet with some sheets 2.5cm thick and others 5cm thick. I then cut out various sections of the curves (5cm thick) as they needed to be stacked on top of each other to make the walls the right height. The templates were fixed with masking tape (you can still see it on the templates above) and then using the hot wire cutter the opposite side was cut - basically with two identical templates sandwiching the polystyrene and acting as a guide for the hot wire cutter. Then fix with masking tape on the cut side, remove from the other and cut that out. 5cm thick was as much as the hot wire cutter could manage:

Some large pieces of polystyrene were glued on to the base to get the initial height (i.e. the level of the bottom of the main door and then the cut sections of the wall glued on top to the relevant height. I used lots of the 'no nails' type glue - whichever make was on offer at the time:

Step 3:
To give the walls strength and a decent finish I then used cut pieces of mounting board to glue on the outside and inside bending it round the curve and gluing in place (cutting the various doorways out was the only real complexity). Make the model both light and very strong. At the same time cutting out shapes of polystyrene for the rocks around the bottom of the walls and filling in at the back as I go along.
Step 4:
Next I added the causeway. The sides in the finished model are the mounting board templates with the polystyrene cut to size in between. The small rocky mound to the side was then built up. At this point I put the rock effect on the mound and the rocks under the walls at the front. I used Polyfilla Woodflex for the job - excellent stuff for modelling and I always have a pot (good for DIY too although I do less of that!). I often only manage to use about half a tub before it starts going hard and has to be thrown away but on this project I used several whole pots. It is ready mixed, sets rock hard and gives a nice texture. I apply with my fingers to smooth it over the polystyrene and leave a rough effect


Step 5:
Now came one of the more complex bits - building the main hall and rocks above it. First the stairs and flat area the hall sits on. Here I used 5mm foam board (basically foam between two pieces of thin card which you can get from artists shops in various sized sheets) for the stairs and walls to the sides of the stairs. The polystyrene was built up behind to give the right level and then sheets of foam board glued on top a bit further back to give the last full width steps.
The hall itself was a sheet of foam board with the arched doorways and windows cut out then some thin card glued on top cut to a similar shape but smaller (although bigger arches) to provide the tiered effect. Narrow strips of mounting board were glued on for the column effect and small strips of very thin card clued round, fitting in the contours, just below the start of the arches. This front piece was then given sides, a back and a top to form a box which was glued in place. Polystyrene was then fit around it to the sides and behind and as the height was built up the 'rocks' were made to come on to the roof as seen above. The Woodflex rock effect was then added.
Step 6:
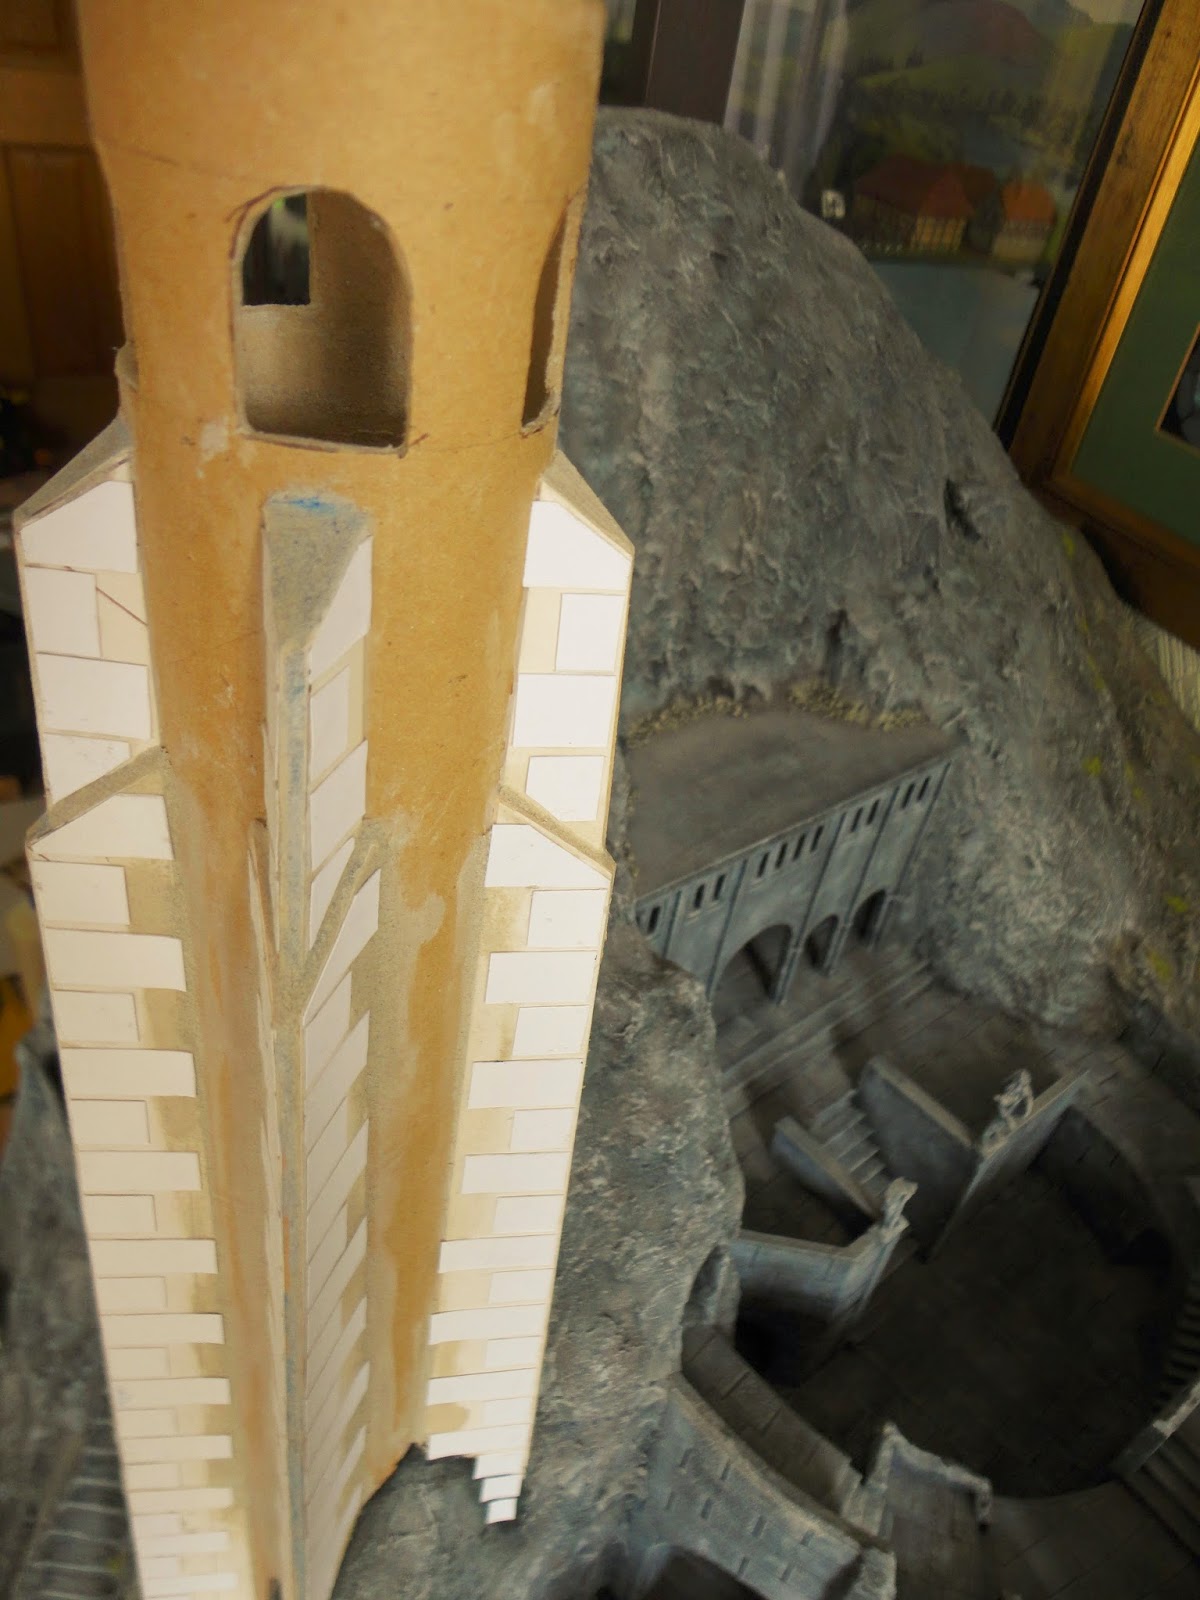
The last main bit of construction before adding the detail was the Hornburg and the side stairs and rocks on that side. The Hornburg was made from a cardboard tube (it was from a wall planner but it is the sort of tube some prints etc. come in). Windows had to be cut out and the plastic end cap was forced inside and glued and reinforced to form the floor of the open air tower room. The buttresses were cut from mounting board with a smaller section sat within a larger to get the design near the top.
The side was build up with foam board steps and foam board for the walls at the top. the rocks above were done last and are very sheer so was mainly about cutting pieces of polystyrene to give a decent shape to the rocks. then as before the Woodflex.
Step 7:
The detail. Various things here and I will just highlight the main approaches.
The statues were Pewter figures from the sets you can buy in gift shops in castles and museums etc. in the UK. They are usually knights or Romans but as we were invaded by Vikings they also include Viking figures which were ideal. One was cut in half as per the version in the film.
For the walls there were two main things to do. One was to give them the right thickness for the battlements - as described above I glued mounting board on the front and back but I made that come up to the right height above the wall at the front. To give the thickness I cut out pieces of foam board and glued them on the inside. The strips I used I cut out on one side with a knife used for mounting pictures - to cut the mounting board with a 45 degree edge. The blades dull quickly and need to change to make sure they are sharp and don't just tear the foam board:

I then used Woodflex to give the right 'stone' effect for the cut bit of the foam board left showing:
The next thing was to give the walls a stone block effect. I used thin card and cut out lots of rectangles:

The were glued on the walls in a pattern to make it look like a stone wall, cutting them where necessary to fit the shape of the walls. I used white PVA glue for this. The insides were the pain as getting my hands in and then doing anything even vaguely dexterous was not easy! I then used a thinned Woodflex and PVA glue mix to paint over to leave a gritty effect on the walls.
The tops of the wall were given a paving effect buy cutting the templates up into pieces and gluing them on:
The same thing was done to the inner courtyard. But the gap between the walls it was done with larger full width pieces to give a long step effect (as per the film version - but I didn't bother with the stepped path against the front of the inner wall which you will see if you watch the film or the DVD Appendices - there is such a thing as going too far!). Also paving on the top of the causeway and stone effect on the sides.
Step 8:
Painting. I actually painted pieces as I went along rather than doing it all at the end. But basically paint it black then dry brush for the most part. The ground outside the front of the castle and some of the lower rock areas I painted GW scorched earth rather than back. Everything was dry brushed medium then light gray - walls and rocks. The ground was dry brushed bleached bone. I had glued some small stones here and there and dry brushed them to be a bit lighter.
Finishing off the Hornburg:
As I noted at the start I built most of this before ever thinking about doing blog articles but I can show you the last few bits which at least shows some of the final stages and the Hornburg unpainted which shows some of the construction.
So this is what I started with on finally getting back to doing this last bit - which took me a couple of days (not non-stop but spread out with waiting for things to dry etc.):

First the stone effect was added to the Hornburg tower. I just did the edges of the buttresses:


Next the remaining bit of the front wall with the stairs at the bottom of the Hornburg. I used a remaining bit of the template for the paving stones:


Cut up and glues in place:

Here you can see the mounting board glued on the inside of the wall in the stair well. Stone effect glued on the inside of the wall (I didn't do any of the stair wells as too fiddly) and the inside of the battlements.

I roughly spread some Woodflex so that the gaps between paving stones not too deep. also, spread across the inside wall in the stair well to give a rough effect:

Then painted it all black before dry brushing. Even doing this wore a large brush down to short bristles.


Some things left to do:
Three things to do to really finish. One is a main gate and as noted before I want to do closed, open and heavily damaged versions that can be put in place and removed as needed. The wooden protection above the main gate - again want to have it removable. Then the main thing is the Deeping Wall. I have been experimenting and done one section with the main construction but not added the detail. Don't think I will try and make the slight curve as per the film - but yet to decide fully. But if I don't then I can use foam board for the front wall rather than mounting board and foam board just behind the battlements. My first experiment:


A few of my other Lord of the Rings posts:
Rohan houses
Gondor scenery
Astounding! Not only beautiful but also playable. Much respect!
ReplyDeleteTop work Steve!
ReplyDeleteSometimes even the best praise falls short!!!
ReplyDeleteIan
Great work,very impressive. Following! Hope to see more of your LOTR work :)
ReplyDeleteHi. I will be doing more LOTR. Will be concentrating on WW2 for a bit as with all may Napoleonic farms and Helm's Deep I have quite a bit to catch up on. But will do some LOTR over the summer
DeleteCool :)
DeleteSeriously impressive!!!!
ReplyDeleteStunning job sir!
ReplyDeletebrilliant
ReplyDeleteWonderful looking Castle. Ace looking WIP too. Beano Boy
ReplyDeleteA truely amazing piece of work. I must say that the LotR crowd makes some of the best terrain pieces. This really looks the part and I actually liek that it is a bit smaller then the "original" in the movies. This way you can still transport it and it can be moved if you say move houses. Some of the more to scale gaming tables suffer a fate of neglect as they cannot be easily moved or are to heavy.
ReplyDeleteI especially like the detailing, design and general look of the main hall. How far in does it go past the arches? I could see some nice LED light effects adding here even more interest.
the hall goes back about 12cm from the arches. Enough to make it look like there is something there. Paving on the floor but the walls are just painted with thinned woodflex to get some roughness and then black and grey dry brush
DeleteJust the finest scratchbuilt Helm's Deep model I have ever seen. Can't wait to see it with those finishing touches!
ReplyDeleteWow, just... just...wow.
ReplyDeletethe best helm's deep model I've ever seen
ReplyDeletewell done
incredible piece, i plan on using it as a reference to build my own (i have done before but on a much larger scale) would it be possible to get some measurements of various sections for scale?
ReplyDeleteAdam. Happy to give you measurements, just let me know what you are after
DeletePretty amazing. I've linked your blog on the Great British Hobbit League Facebook site, so you may see some more traffic than usual...
ReplyDelete